This is very important Application for any Web Developer.In this Application You can Easily insert data in SQL Database and Print the Grid view data in Windows form application.You can easily make many Application as shown below:
Step1:- First Create a Table in database . Here I have created a 'RAM' table in 'Master' System Database.
See it :-
Step2:- Create a Widows Forms Application. Go through this, File->New Project->Select Widows Forms Application->Select Visual c# (From Left Window)->Choose Application Name(Here my application is 'text')->Click OK->Form1 will open.
See it:-
See here:->
Note-> some code are not shown in the image
- Library Book Submission Application.
- School Fee Submission Application.
- Web Application. etc
- Take print receipt using printer .
Step1:- First Create a Table in database . Here I have created a 'RAM' table in 'Master' System Database.
See it :-
See it:-
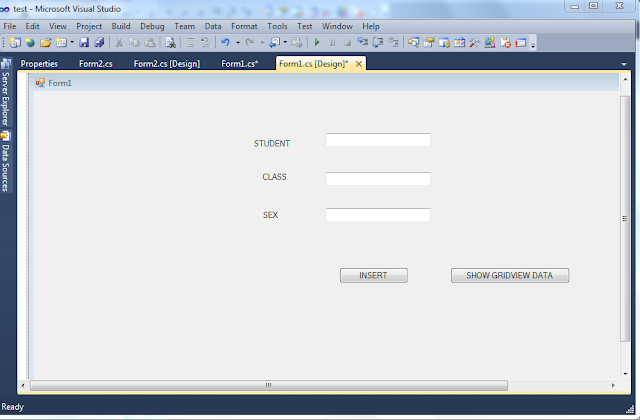
Step3:- Design this type of interface on Form1.cs(Design) Which is given as below.
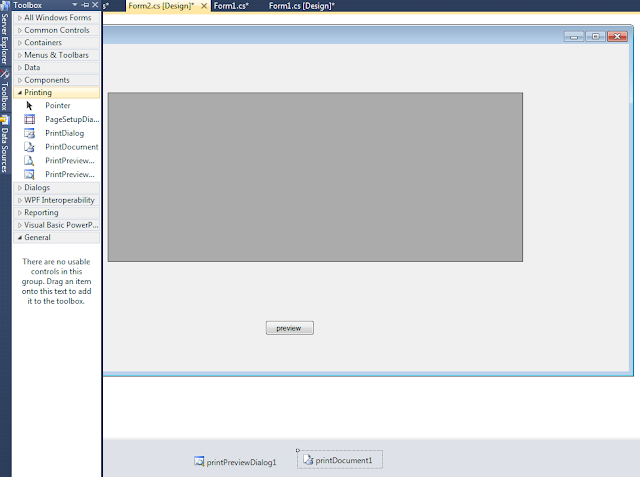
Step4:- Add New Form from Solution Explorer. Drag and Drop Grid View control and Button from Toolbox on Form2.cs(Design).After that Drag and Drop' PrintPreviewDialog1' and 'PrintDocument1' from Toolbox as shown below:
Step5:- Go to the Property of print Document1 and Set Document Name=Document-->go property of printPreviewDialog1 & select Document= printDocument1 . Which is as shown below:-
Step6:- Now go back From1 and double click on 'Insert' Button , 'Show Grid View Data' Button and written the code(Form1.cs) ,which are as given below:-
using System;
using System.Collections.Generic;
using System.ComponentModel;
using System.Data;
using System.Drawing;
using System.Linq;
using System.Text;
using System.Windows.Forms;
using System.Data.SqlClient;

namespace test
{
    public partial class Form1 : Form
    {
        public Form1()
        {
            InitializeComponent();
        }
        SqlDataAdapter da;
        DataSet ds;
        SqlConnection con;
        private void button1_Click(object sender, EventArgs e)
        {
            con = new SqlConnection("data source=RAMASHANKER-PC;Integrated Security=Yes;Database=master");
            da = new SqlDataAdapter("insert into RAM(STUDENT,CLASS,SEX)values('" + textBox1.Text + "','" + textBox2.Text + "','" + textBox3.Text + "')", con);
            ds = new DataSet();
            da.Fill(ds);
            MessageBox.Show("Registration has been successful");
        }
        private void button2_Click_2(object sender, EventArgs e)
        {
            Form2 f2 = new Form2();
            f2.Show();
        }
    }
}
See here:->
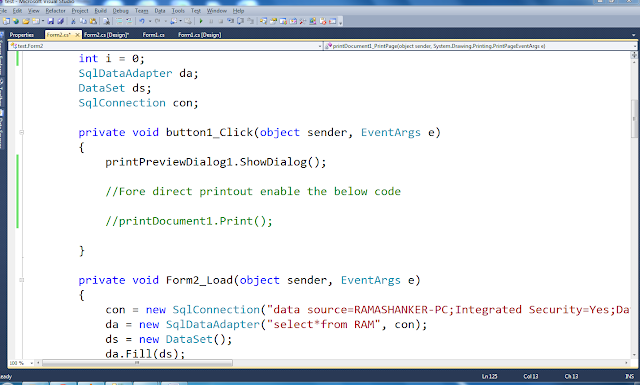
Step7:-> Go again Form2 .cs(Design) Double click on Preview Button and write the following codes (Form2.cs),which are given below:-
using System.Data;
using System.Drawing;
using System.Linq;
using System.Text;
using System.Windows.Forms;
using System.Data.SqlClient;

namespace test
{
    public partial class Form2 : Form
    {
        public Form2()
        {
            InitializeComponent();
        }
        int i = 0;
        SqlDataAdapter da;
        DataSet ds;
        SqlConnection con;

        private void button1_Click(object sender, EventArgs e)
        {
            printPreviewDialog1.ShowDialog();

            //Fore direct printout enable the below code

            //printDocument1.Print();

        }
        private void Form2_Load(object sender, EventArgs e)
        {
            con = new SqlConnection("data source=RAMASHANKER-PC;Integrated Security=Yes;Database=master");
            da = new SqlDataAdapter("select*from RAM", con);
            ds = new DataSet();
            da.Fill(ds);
            dataGridView1.DataSource = ds.Tables[0];
        }

        private void printDocument1_PrintPage(object sender, System.Drawing.Printing.PrintPageEventArgs e)
        {
            int width = 0;
            int height = 0;
            StringFormat str = new StringFormat();
            str.Alignment = StringAlignment.Near;
            str.LineAlignment = StringAlignment.Center;
            str.Trimming = StringTrimming.EllipsisCharacter;
            Pen p = new Pen(Color.Black, 2.5f);

            #region Draw Column 1

            e.Graphics.FillRectangle(Brushes.LightGray, new Rectangle(100, 100, dataGridView1.Columns[0].Width, dataGridView1.Rows[0].Height));
            e.Graphics.DrawRectangle(Pens.Black, 100, 100, dataGridView1.Columns[0].Width, dataGridView1.Rows[0].Height);
            e.Graphics.DrawString(dataGridView1.Columns[0].HeaderText, dataGridView1.Font, Brushes.Black, new RectangleF(100, 100, dataGridView1.Columns[0].Width, dataGridView1.Rows[0].Height), str);

            #endregion

            #region Draw column 2

            e.Graphics.FillRectangle(Brushes.LightGray, new Rectangle(100 + dataGridView1.Columns[0].Width, 100, dataGridView1.Columns[0].Width, dataGridView1.Rows[0].Height));
            e.Graphics.DrawRectangle(Pens.Black, 100 + dataGridView1.Columns[0].Width, 100, dataGridView1.Columns[0].Width, dataGridView1.Rows[0].Height);
            e.Graphics.DrawString(dataGridView1.Columns[1].HeaderText, dataGridView1.Font, Brushes.Black, new RectangleF(100 + dataGridView1.Columns[0].Width, 100, dataGridView1.Columns[0].Width, dataGridView1.Rows[0].Height), str);

            //Drawcolumn 3

            e.Graphics.FillRectangle(Brushes.LightGray, new Rectangle(100 +100+ dataGridView1.Columns[1].Width, 100, dataGridView1.Columns[1].Width, dataGridView1.Rows[0].Height));
            e.Graphics.DrawRectangle(Pens.Black, 100 +100+ dataGridView1.Columns[1].Width, 100, dataGridView1.Columns[1].Width, dataGridView1.Rows[0].Height);
            e.Graphics.DrawString(dataGridView1.Columns[2].HeaderText, dataGridView1.Font, Brushes.Black, new RectangleF(100 + dataGridView1.Columns[1].Width, 100, dataGridView1.Columns[0].Width, dataGridView1.Rows[1].Height), str);

            width = 100 + dataGridView1.Columns[0].Width;
            height = 100;

            //variable i is declared at class level to preserve the value of i if e.hasmorepages is true
            while (i < dataGridView1.Rows.Count)
            {
                if (height > e.MarginBounds.Height)
                {
                    height = 100;
                    width = 100;
                    e.HasMorePages = true;
                    return;
                }
                height += dataGridView1.Rows[i].Height;
                e.Graphics.DrawRectangle(Pens.Black, 100, height, dataGridView1.Columns[0].Width, dataGridView1.Rows[0].Height);
                e.Graphics.DrawString(dataGridView1.Rows[i].Cells[0].FormattedValue.ToString(), dataGridView1.Font, Brushes.Black, new RectangleF(100, height, dataGridView1.Columns[0].Width, dataGridView1.Rows[0].Height), str);

                e.Graphics.DrawRectangle(Pens.Black, 100 + dataGridView1.Columns[0].Width, height, dataGridView1.Columns[0].Width, dataGridView1.Rows[0].Height);
                e.Graphics.DrawString(dataGridView1.Rows[i].Cells[1].FormattedValue.ToString(), dataGridView1.Font, Brushes.Black, new RectangleF(100 + dataGridView1.Columns[0].Width, height, dataGridView1.Columns[0].Width, dataGridView1.Rows[0].Height), str);

                e.Graphics.DrawRectangle(Pens.Black, 200 + dataGridView1.Columns[0].Width, height, dataGridView1.Columns[0].Width, dataGridView1.Rows[0].Height);
                e.Graphics.DrawString(dataGridView1.Rows[i].Cells[2].FormattedValue.ToString(), dataGridView1.Font, Brushes.Black, new RectangleF(200 + dataGridView1.Columns[0].Width, height, dataGridView1.Columns[0].Width, dataGridView1.Rows[0].Height), str);
                width += dataGridView1.Columns[0].Width;
                i++;
            }
            #endregion

        }

    }
}
Note-> some code are not shown in the image
Step8:-> Run the project(click F5).You can easily Insert Data in database and print the Grid View data as shown below.
See here:-
Now click on Preview Button ,then You will see a Preview window, Now you can easily print the grid view data. If want to print the grid view data on click the Preview button then you can enable and disable some codes ,which are shown below:
codes are:-
printDocument1.Print(); --> disable the Comment .
printPreviewDialog1.ShowDialog(); --> Comment it.
See it:->Preview window
For more ...
- Add sql Database(.mdf) in Asp.NetApplication
- Create .dll File and Use in Asp.netApplication
- Create a Setup File
- Take Print receipt in Windows FormApplication File Handling Real
- Application Ado.Net Application
- Xml Application
- How to implement transaction concepts on website
- How to deploy web services in setup file in asp.net
- How to perform insert ,edit,delete, update and print operation in Grird view control
- How to create generic handler in asp.net application
- How to implement validation controls in asp.net application
- How to use Navigation control in asp.net application
- File and File info class in c#
- Real example of call by value and call by reference in c#
- How to use secure login page in asp.net with example
- How to Add and verify Captcha image in 3 tier architecture in asp.net
- How to use virtual keyboard in asp.net for security purpose
- How to implement hashing concepts in asp.net
- Learn complete .Net Interview Questions and answers for job seekers
download whole Attached Application :-


thanks for this application it helps me alot...
ReplyDeletehi,
ReplyDeletei tried the above code exactly the same but m not able show to printpreview data its saying no document does not contains any data.
can you plz help me
@Asha,Drag and Drop' PrintPreviewDialog1' and 'PrintDocument1' AND go Property of print Document1 and Set Document Name=Document. you have not set document property first set it.otherwise download whole application and run your system and check each step,it will help alot.
ReplyDeletesir please provide me coding for search retreive the data from sql server 2005 database with windows from application
Deletethank you so much i got the output
ReplyDeleteSir How Insert Image column in asp.net datagrid view and retrive that perticular image on the form also?
ReplyDeletehello sir, Is it possible to display count down time in data grid view?
ReplyDeleteHay ram Its Nice,thank you very much its help full to me...But ofter click on print it only give's header text only...i dont know what have to do.. i am new to c#.net please help...
ReplyDeletefollow each step carefully,first take preview after that click print it button.download whole application,change only connection strings it will work..........
Deleteya it works fine but the column names are overlaps :(
ReplyDeleteIf i click preview button it shows "Document don't contain any pages", please help me sir....
ReplyDeleteBut i can able to view all the table values in the datagridview
follow step 5 carefully go property of printPreviewDialog1 and select Document = printDocument1.
Deletethen it will work........
Ok Boss now it works good...
ReplyDeletebut if i need to add more than two rows how should i do can you send me a sample code of displaying 5 rows of values from datagridview to printpreviewdialog...
hi shanmuga ! see step 7--> line 37 to 48 ,i have draw first column-->similarly line 51 to 61 draw second column -->simalarily you have to add fourth and fifth column just below the third column--->all codes are same but little difference.--> Now see line 90 to 94 --> show the first column length in grid view--> line 96 to 100 show second column value with 100 distance from first column-->similarly third column also--> add same code for fourth and fifth with 100 distance.Then you will able to show the five column value in grid view and can get print out it.
DeleteOk Boss, let me try...
ReplyDeleteHey i have 4 columns in my data grid view instead of 3.. What should i change in my code?
ReplyDeletehi Jay ! see above my comment section i have already told ,how to increase column in your gried view control..
Deleteits possible to display insert and update both process threw one button simultaneously?
ReplyDeleteNo ,one button will work for one functionality only.To overcome this problem use ajax (java script ,jquery) functionality.if you click insert button -->then update button will be displayed on same position and insert button will be disappears at that time.
ReplyDeleteThanks..., This helped me a lot
ReplyDeletehi
ReplyDeleteThanks for this application very useful
and under this print preview page how to add header and footer and how to rotate the page in this code how add.
hi,
ReplyDeletei tried the above code exactly the same but m not able show to printpreview data its saying no document does not contains any data.
can you plz help me
hi joseph,
DeleteIt is working well, follow step 5 carefully ,it will work definitely....
hello sir how to create 1 master and 3 slave database which are located in different different places and how to connect master and slave database
ReplyDeleteHy Bro i am using your code same but getting an error message like:
ReplyDeleteNo overload for 'button1_Click' matches delegate 'EventHandler'