There are three control used in asp.net to display the Entire table data.
Note:-You can create table separately in database(Sql ,MySQL etc.) and connect to this application .If you are facing any problem to add .mdf file on website then visit below :-- Repeater control
- Grid View control
- Data List control
But there are some difference in these controls which are given below:-
- Repeater and Data list controls don't have any default layout.We specify the template to display the data but Grid view control has a default layout to display the data in Row and Column.
- By default on browser side Repeater control is not converted in any 'HTML' tag but Grid view and Data List control are converted in 'HTML' table tag.
- Repeater control does not have any predefined Event to added and delete the record but Grid view and Data List control have this Event to to added and delete the record.
The Repeater control is used to display a repeated data that are bound to the control. We can bound a Database file,XML file and other file to the control.
In our real life repeater control is using in many asp.net application(ex.website,software etc).
In this tutorial i will implement following things which are given below:-
- Display data in Repeater control through database(ex. sql server,etc).
- Insert data in Repeater control.
- Edit data in Repeater control.
- Update data in Repeater control.
- Delete data in Repeater control.
- Take print out of Repeater control's data.
We can use this application for any website(ex.e-commerce website,educational website , gov. website ,etc.).
There are some steps to implement this concept which are given below:-
Step 3 :- Now open your Default.aspx page -->Click Source from below-->Write the following Repeater layout code(html code) as given below:-
<%@ Page Language="C#" AutoEventWireup="true" CodeFile="Default.aspx.cs" Inherits="_Default" %>

<!DOCTYPE html PUBLIC "-//W3C//DTD XHTML 1.0 Transitional//EN" "http://www.w3.org/TR/xhtml1/DTD/xhtml1-transitional.dtd">

<html>
<head id="Head1" runat="server">
    <title></title>
    <style type="text/css">
        #form1
        {
            height: 417px;
            width: 881px;
        }
    </style>
</head>
<body style="height: 394px; width: 876px;">
    <form id="form1" runat="server">
    <asp:Button ID="Button6" runat="server" onclick="Button6_Click"
        style="font-weight: 700; color: #800000; text-decoration: underline; font-size: medium"
        Text="Print below page data" />
    <br />
    <asp:Label ID="Label4" runat="server"
        style="color: #FF0000; font-size: large" Text="*"></asp:Label>
<asp:Repeater id="Repeater1" runat="server" onitemcommand="insert">
<HeaderTemplate>
<table border="1" width="100%" >
<tr>
<th align="left">SID</th>
<th align="left">NAME</th>
<th align="left">AGE</th>
<th align="left">MAKE CHANGE</th>
</tr>
</HeaderTemplate>
<ItemTemplate>
<tr>
<td><asp:Label ID="Label1" runat="server" Text='<%#Eval("sid")%>'/></td>
<EditItemTemplate>
<td><asp:TextBox ID="TextBox4" runat="Server" Text='<%#Eval("name")%>'></asp:TextBox></td>
</EditItemTemplate>
<EditItemTemplate>
<td><asp:TextBox ID="TextBox5" runat="Server" Text='<%#Eval("age")%>'></asp:TextBox></td>
</EditItemTemplate>
<td>
<asp:Button ID="Button1" runat="server" style="color: #800000;font-size: large" CommandName="up" Text="Update" />
<asp:Button ID="Button2" runat="server" style="color: #0000FF;font-size: large" CommandName="del" Text="Delete" />
</td>
</tr>
</ItemTemplate>
<SeparatorTemplate>
<tr>
<td colspan="6"><hr></td>
</tr>
</SeparatorTemplate>
<FooterTemplate>
<tr>
<%--<td><asp:TextBox ID="TextBox1" runat="server"></asp:TextBox></td>--%>
<td><asp:Label ID="Label2" runat="server" Text="Label"></asp:Label></td>
<td><asp:TextBox ID="TextBox2" runat="server"></asp:TextBox></td>
<td><asp:TextBox ID="TextBox3" runat="server"></asp:TextBox></td>
<td><asp:Button ID="Button5" runat="server" style="color: #FF0000;font-size: large" CommandName="in" Text="Insert"/>
</td>
</tr>
</FooterTemplate>
</asp:Repeater>
</form>
</body>
</html>Description:- I have putted all Repeater layout code within html and body tag as given below:-
<html>
<title </title>
<head></head>
<body>
<form>
<HeaderTemplate></HeaderTemplate>
<ItemTemplate></ItemTemplate>
<SeparatorTemplate></SeparatorTemplate>
<FooterTemplate></FooterTemplate>
</form>
</body>
</html>
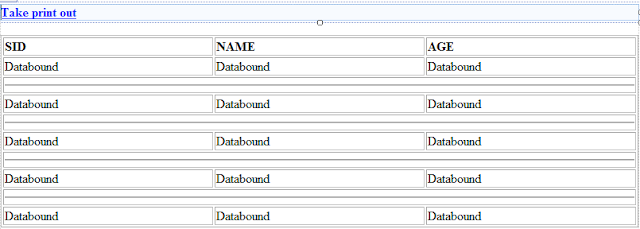
Step 4 :-Now click Design from the below of Default.aspx page-->you will see following layout:-
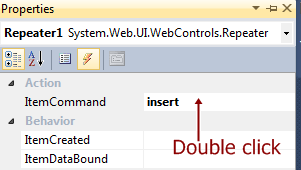
Step 5 :- Now go properties of Repeater control-->Click Events-->Item command-->write command Name-->Double click on that for generating the handler as shown below:-
Step 6 :- Now double click on the page(or press F7)-->write the c#codes for database connection,insert,Edit,Update and Delete handlers code on Default.aspx.cs as given below:-
using System;
using System.Web;
using System.Web.UI;
using System.Web.UI.WebControls;
using System.Data.SqlClient;
using System.Data;
using System.IO;

public partial class _Default : System.Web.UI.Page
{
    protected void Page_Load(object sender, EventArgs e)
    {

        if (!IsPostBack)
        {
            GetData();
        }
    }

    protected void GetData()
    {
    SqlConnection con = new SqlConnection(@"Data Source=.;AttachDbFilename=|DataDirectory|\Database.mdf;Integrated Security=True;User Instance=True;Max Pool Size=20; Connection Timeout=10;");

    try
        {

    con.Open();
    SqlCommand cmd = new SqlCommand("select * from student", con);
    SqlDataAdapter da = new SqlDataAdapter(cmd);
    DataSet ds = new DataSet();
    da.Fill(ds);
    Repeater1.DataSource = ds.Tables[0];
    Repeater1.DataBind();
         }
        finally
     {
        con.Close();
     }

    }
    protected void insert(object source, RepeaterCommandEventArgs e)
    {
        if (e.CommandName == "in")
        {
     SqlConnection con = new SqlConnection(@"Data Source=.;AttachDbFilename=|DataDirectory|\Database.mdf;Integrated Security=True;User Instance=True;Max Pool Size=20; Connection Timeout=10;");
            con.Open();
            //uncomment below code if you want to manually enter sid value.but you will have to change
            //identity property of the student table column.
           // String sid = ((TextBox)e.Item.FindControl("TextBox1")).Text;
            String sid = ((Label)e.Item.FindControl("Label2")).Text;
            String name = ((TextBox)e.Item.FindControl("TextBox2")).Text;
            String age = ((TextBox)e.Item.FindControl("TextBox3")).Text;
            SqlCommand cmd = new SqlCommand("insert into student values('"+name+"','"+age+"')", con);
            int i = cmd.ExecuteNonQuery();
            if (i > 0)
            {
                Label4.Text = "Recard inserted successfully....";
                GetData();
            }
        }
            else if (e.CommandName == "up")
            {
        SqlConnection con1 = new SqlConnection(@"Data Source=.;AttachDbFilename=|DataDirectory|\Database.mdf;Integrated Security=True;User Instance=True;Max Pool Size=20; Connection Timeout=10;");
                con1.Open();
                String sid = ((Label)e.Item.FindControl("Label1")).Text;
                String name = ((TextBox)e.Item.FindControl("TextBox4")).Text;
                String age = ((TextBox)e.Item.FindControl("TextBox5")).Text;
                SqlCommand cmd = new SqlCommand("update student set name='"+ name + "',age='" + age + "' where sid ='" + sid + "'", con1);
                int i = cmd.ExecuteNonQuery();
                if (i > 0)
                {
                    Label4.Text = "Recard Updated successfully....";
                    GetData();
                }
            }
        else if (e.CommandName == "del")
        {
      SqlConnection con1 = new SqlConnection(@"Data Source=.;AttachDbFilename=|DataDirectory|\Database.mdf;Integrated Security=True;User Instance=True;Max Pool Size=20; Connection Timeout=10;");
            con1.Open();
            String sid = ((Label)e.Item.FindControl("Label1")).Text;
            SqlCommand cmd = new SqlCommand("delete from student where sid='" + sid + "'", con1);
            int i = cmd.ExecuteNonQuery();
            if (i > 0)
            {
                Label4.Text = "Recard Deleted successfully....";
                GetData();
            }
        }

    }
    protected void Button6_Click(object sender, EventArgs e)
    {
        Response.Redirect("default2.aspx");
    }
}
Step 7 :- Now Add another web form (Default2.aspx)-->click Source -->and write Repeater layout codes (html and java script) as given below:-
<%@ Page Language="C#" AutoEventWireup="true" CodeFile="Default2.aspx.cs" Inherits="Default2" %>

<!DOCTYPE html PUBLIC "-//W3C//DTD XHTML 1.0 Transitional//EN" "http://www.w3.org/TR/xhtml1/DTD/xhtml1-transitional.dtd">

<html>
<head>
    <title></title>
    <script type="text/javascript">
         function print_page() {
             window.print();
         }
    </script>
</head>
<body style="height: 327px; width: 802px;">
    <form id="form1" runat="server">
    <div>
<a href="#" onclick="javascript :print_page();"><strong><span class="style1">Take print out</span></strong></a>
</div>
<asp:Repeater id="Repeater1" runat="server">
<HeaderTemplate>
<table border="1" width="100%" >
<tr>
<th align="left">SID</th>
<th align="left">NAME</th>
<th align="left">AGE</th>
</tr>
</HeaderTemplate>
<ItemTemplate>
<tr>
<td><asp:Label ID="Label1" runat="server" Text='<%#Eval("sid")%>'/></td>
<td><asp:Label ID="Label2" runat="server" Text='<%#Eval("name")%>'/></td>
<td><asp:Label ID="Label3" runat="server" Text='<%#Eval("age")%>'/></td>
</tr>
</ItemTemplate>
<SeparatorTemplate>
<tr>
<td colspan="6"><hr></td>
</tr>
</SeparatorTemplate>
<FooterTemplate>
</FooterTemplate>
</asp:Repeater>
</form>
</body>
</html>
<html>
<head>
    <title></title>
    <script type="text/javascript">
         function print_page() {
             window.print();
         }
    </script>
</head>
<body>
<form>
<div>
<a href="#" onclick="javascript :print_page();"><strong><span class="style1">Take print out</span></strong></a>
</div>
</form>
</body>
Step 9 :- Now Double click on Default2.aspx page(or press F7)-->write the following codes on Default2.aspx.cs page as given below:-
using System;
using System.Web;
using System.Web.UI;
using System.Web.UI.WebControls;
using System.Data.SqlClient;
using System.Data;
using System.IO;

public partial class Default2 : System.Web.UI.Page
{
    protected void Page_Load(object sender, EventArgs e)
    {
SqlConnection con = new SqlConnection(@"Data Source=.;AttachDbFilename=|DataDirectory|\Database.mdf;Integrated Security=True;User Instance=True;Max Pool Size=20; Connection Timeout=10;");

        try
        {

            con.Open();
            SqlCommand cmd = new SqlCommand("select * from student", con);
            SqlDataAdapter da = new SqlDataAdapter(cmd);
            DataSet ds = new DataSet();
            da.Fill(ds);
            Repeater1.DataSource = ds.Tables[0];
            Repeater1.DataBind();
        }
        finally
        {
            con.Close();
        }
    }
}
Step 10:- Now Run the Application(press F5).Follow below points to run the application perfectly.
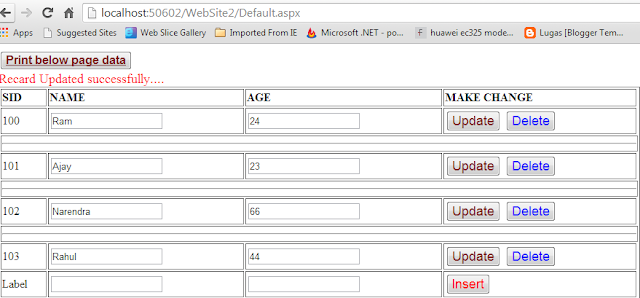
- Now write NAME and AGE Field values-->Press Insert button as shown below:-
- Now Update the record sid=102 as shown below:-
- Now Delete the record sid=101 as shown below:-
- Now take preview of Repeater's data-->click "print below page data"button as shown below:-
- Now print the Repeater data-->click"Take print out" button as shown below:-
Note:- In coming tutorials i will explain insert,edit ,update,delete and print in Grid view and Data List control in asp.net.
For More:-
- How to print Grid View Data in Windows form application
- How to make manual registration page in asp.net
- Multi threading in c#
- File handling in c#
- File handling real application
- Ado.net Application
- Add captcha image in asp.net application
- Create setup file with database
- How to make composite application
- Session state in asp.net
Download


0 comments:
Post a Comment