Hi Friend, Today, we will learn about ResizableControlExtender control in Ajax Toolkit. So before learning this control, you have to install Ajax Toolkit on your visual studio.You install it from here . The ResizableControlExtender control provides a graphical handle that enables the users to dynamically resize the control. You can put resizing limit (maximum and minimum property) of your control when it is rendered for the first time. You can see ,the handle is placed at the bottom right corner of the control.When a user resizes the control,the content within the control automatically resizes to fit to the new dimension.
There are some properties of ResizableControlExtender control as given below:-
1.) TargetControlID:- It is helpful to sets the ID of the control which you want to resize.
2.) HandleCssClass:- It sets the name of cascading style sheet (css) class that is applied to the resize handle.
3.) ResizableCssClass:- It sets the name of the css class that is applied to the control while resizing.
4.) MaximumHeight:- It is helpful to sets the maximum height of the resizable control.There are some properties of ResizableControlExtender control as given below:-
1.) TargetControlID:- It is helpful to sets the ID of the control which you want to resize.
2.) HandleCssClass:- It sets the name of cascading style sheet (css) class that is applied to the resize handle.
3.) ResizableCssClass:- It sets the name of the css class that is applied to the control while resizing.
5.) MinimumHeight:- It is helpful to sets the minimum height of the resizable control.
6.) Maximumwidth:- It is helpful to sets the maximum width of the resizable control.
7.) Minimumwidth:- It is helpful to sets the minimum width of the resizable control.
8.) OnClientResizeBegine:- It is helpful to specifies the event name that is fired when control start resizing.
9.) OnClientResizing:-It specifies the event name that is fired when the control is being resized
10.) OnClientResize:-It specifies the event name that is fired when the control has been resized
11.) HandleOffsetX:- It sets the distance of the resize handle from the control relative to x axis.
12.) HandleOffsetY:- It sets the distance of the resize handle from the control relative to y axis.
There are some steps to implement the above whole concepts as given below:-
Step 1:- First open your visual studio --> File --> Website --> Select ASP.NET Empty Website --> OK --> Open Solution Explorer --> Add a New Page (Default.aspx) page --> Create a new folder (images)--> Paste images from your desktop inside it as shown below:-
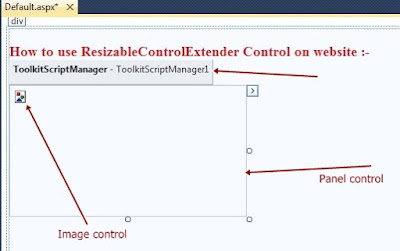
Step 2:- Now Drag and Drop ToolkitScriptManager , Panel and image controls from tool Box as shown below:-
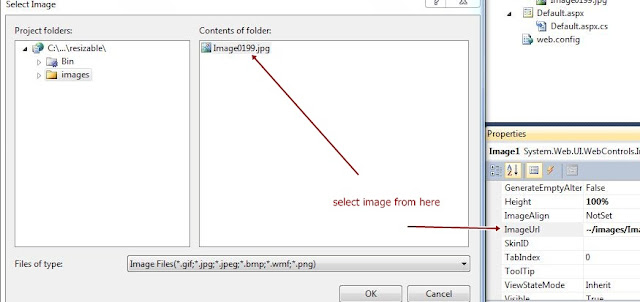
Step 3:- Now Set the ImageUrl Path from the image Properties as shown below:-
Step 4:- Now open Source --> drag and drop ResizableControlExtender Control as shown below:-
Step 5:- Now set ResizableControlExtender Control properties --> Create style CSS sheet Class also as given below in codes.
<%@ Page Language="C#" AutoEventWireup="true" CodeFile="Default.aspx.cs" Inherits="_Default" %>

<%@ Register assembly="AjaxControlToolkit" namespace="AjaxControlToolkit" tagprefix="asp" %>

<!DOCTYPE html PUBLIC "-//W3C//DTD XHTML 1.0 Transitional//EN" "http://www.w3.org/TR/xhtml1/DTD/xhtml1-transitional.dtd">

<html xmlns="http://www.w3.org/1999/xhtml">
<head runat="server">
    <title></title>
    <style type="text/css">
        .csshandling
 {
  width:20px;
  height:20px;
  background-color:Lime;
  display:block;
  cursor: crosshair;
 }
 .cssresizing
 {
  padding:4px;
  border-style:solid;
  border-width:5px;
  border-color:Red;
  line-height:normal;
 }
    </style>
</head>
<body>
    <form id="form1" runat="server">
    <div>

        <strong>
        <br class="style1" />
        <span class="style2">How to use ResizableControlExtender
        Control on website :-</span></strong><br />
        <asp:ToolkitScriptManager ID="ToolkitScriptManager1" runat="server">
        </asp:ToolkitScriptManager>
        <div>
        <asp:Panel ID="Panel1" runat="server" Height="169px" Width="305px">
            <asp:Image ID="Image1" runat="server" Height="100%"
                ImageUrl="~/images/Image0199.jpg" Width="100%" />
        </asp:Panel>
        <asp:ResizableControlExtender ID="ResizableControlExtender1" runat="server"
        TargetControlID="Panel1" HandleCssClass="csshandling" ResizableCssClass="cssresizing"
        MaximumHeight="600" MinimumHeight="20" MaximumWidth= "600" MinimumWidth="25" HandleOffsetX="5" HandleOffsetY = "5" >
        </asp:ResizableControlExtender>
        </div>
    </div>
    </form>
</body>
</html>
- Remember , Your image width and height should be 100%, otherwise it doesn't work.
- You can change your css class according to your requirements which is given below:-
.csshandling
{
width:20px;
height:20px;
background-color:Lime;
display:block;
cursor: crosshair;
}
.cssresizing
{
padding:4px;
border-style:solid;
border-width:5px;
border-color:Red;
line-height:normal;
} Step 6:- Now Run the application (Press F5) --> You will see following output as given below:-
For More...
- Learn whole Linq concepts with real life examples
- Learn Sql concepts with real life examples
- Learn complete Ado.Net concepts with examples
- Learn complete .NET Projects with examples
- Learn complete .NET Interview Questions and Answers
Download


0 comments:
Post a Comment